EXAMINATIONS

Sample Q&A’s

General Notes :
  • 1. It is suggested that applicants attempt these questions before looking at the answers.
  • 2. In the examination, any essential extract from AS/NZS 3788 or other documents will be supplied, unless applicants are notified to bring AS/NZS 3788 etc.
  • 3. Underlined words are important in understanding questions.
  • 4. Answers to each question are generally presented in order of importance.
In-Service Inspector Sample Q & A’s
1. Pitting corrosion up to 1mm deep is detected locally in the shell of a small 1MPa boiler after 10 years of excellent service with negligible metal loss up to the previous inspection 1 year ago. What action(s) would you take as an inspector to assist your client? 5 marks
Answer
  • Sudden pitting suggests major change in operation or conditions.
  • Need immediate correction as 1mm loss/year is very significant [especially on small thin-walled boilers and tubes].
  • Could be due –
    a a) to leaking valves or rain [if external corrosion]. Then
    b fix leaks and paint.
    b) loss of feed water control, condensate, oxygen, chemicals [if internal corrosion of shell or tubes]. Correct changes.
    c) may be others. Investigate further if needed.
  • Record briefly and advise client as above.
1. SISI Identify the most appropriate answer using letter and number:
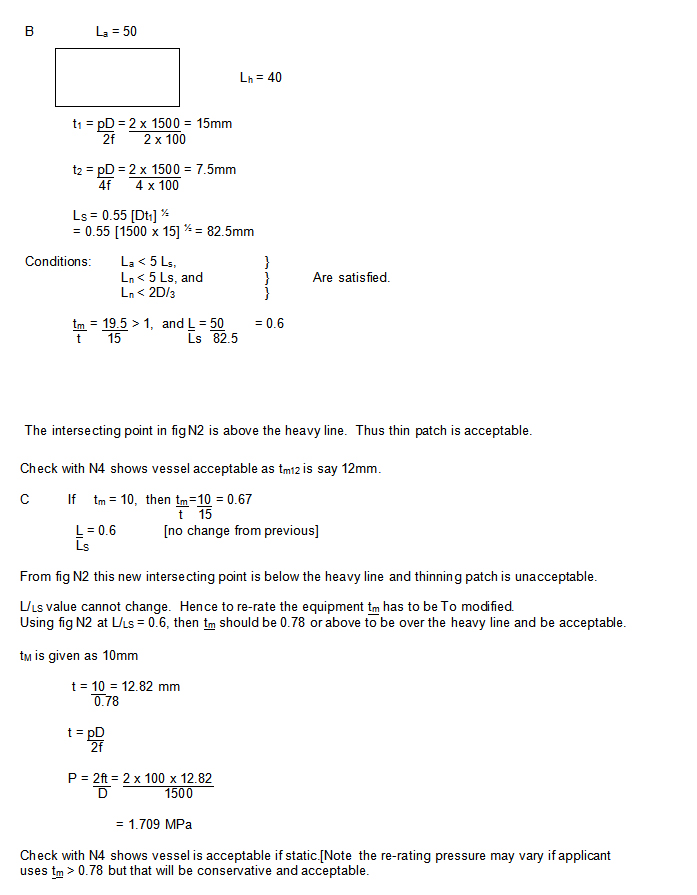
A short horizontal cylindrical pressure vessel suffers from heavy external corrosion damage in the form of local wastage over an area of 2000 mm2 . What would be your recommendations on the need to de-rate the design pressure of the vessel at the same design temperature, for each of the following conditions :
A. The remaining wall thickness at the thinnest point is equal to the design thickness.
B. The minimum mean thickness tm over the wasted area is 19.5mm.
C. The minimum mean thickness tm over the wasted area is 10mm?. The following data is given: Nominal thickness of the affected carbon steel plate is 25mm.
Vessel mean diameter is 1500mm
The wasted area is 50mm x 40mm (La x Lh), is not near any weld, opening or support, and its dimensions cannot be changed.
Design pressure is 2 MPa; and the design strength of the plate material is 100MPa at the design temperature.
Measures have been taken to ensure future corrosion is nil. Data from As/NZS 3788 is supplied (applicants will be advised if the examination is an open book and requires this Standard) 20 marks
Answer

A. As the remaining thickness is equal to the design thickness, the thinning can be accepted.
No need to re-rate design pressure [except if very significant sudden loss from actual to design thickness and CA is small].

Explain what you understand by “risk management”, “ risk assessment” and “quality assurance” and identify the main differences between them. 10 marks
Answer

[Note: These terms are used differently by different persons but the intent for AICIP is below.]
Risk Management (B1) Overall management of risk to “optimise safety, efficiency and profitability”. It includes hazard identification, risk assessment, risk control and continued monitoring.

Risk assessment (B2.6) “quantification of total risk [i.e. likelihood of failure and consequence to life, property, environment & production] and is a combination of previous studies and analyses, which depend on equipment inspection procedures and incident reporting”.

Quality Assurance – the management system documented or not, which provides evidence and confidence that the quality of operations should provide products or services fit for purpose and to specification.

Risk Management is focused on overall management of risk in a business while quality assurance addresses overall management to provide a quality product [or service]. They are related and are essential parts of a “total management system”.

Risk Assessment is an important part of the overall process of management of risk.

All play a role in the overall control of pressure equipment to comply with the National Standard for Plant and most regulations.

EXERCISE NO.2
As an independent inspector you are requested by the plant operator to urgently carry out a periodic inspection for the first time to show that the vessel (in the examination room) is “safe” for continued service so that the owner can comply with the National Standard for Plant.
Vessel details are:
  • manufactured in 1975, installed in 1977 (see nameplate)
  • located outside the building in a highly industrialised area (or seaboard or inland)
  • reported to normally contain non-harmful gas supplied by the compressor at 1.0 MPa and 90°C
  • assume the volume is 100L and any defects are assessed by AS/NZS 3788 Appendix W.
  • no manufacturer’s data report or previous inspection documents are available.
Applicants are requested not to remove any sticker on the vessel. THEN MOVE TO YOUR DESK TO ANSWER THE REMAINING PARTS OF THIS EXERCISE The vessel in the examination room cannot be moved or operated during the examination. Extracts from AS/NZS 3788, AS 3920.1 and National Standard for Plant which are relevant are attached to assist in answers.
Answer
  • Give rough sketch of vessel with approx. main dimensions [not given here].
  • Data Plate details [Copy details]
  • PRV checked OK. PG OK.
  • Mild steel approx. 6mm shell and heads.
  • Stop valve appears OK.
  • Crack at position X: corrosion at Y: Dent at Z [locate on sketch.]
Back to top